First we will download and install VAC on the host PC.
Stream one audio channel to all zero clients using Virtual Audio Cable (VAC)
Stream one audio channel to all zero clients using Virtual Audio Cable (VAC)
In the following guide we will walk you through on how to stream the same audio
channel on multiple screens by using a third-party application called “Virtual Audio Cable”.
We recommend using this application as it’s very reliable and works well with MAWi.
Please note:
This software is not a freeware and its cost is 50US$, one time fee for a single PC. To purchase it please use this link.
REQUIREMENTS
System Requirements for Virtual Audio Cable (VAC):
Server 2008, Windows 7, Windows8/8.1, Windows10 platforms – 32-bit or 64-bit. Physical or virtualized host.
Trial version has the following limitations:
Supports up to 3 redirections and adds female voice reminder every several seconds.
Make it a standard installation:
If your system is 32bit, use the setup.exe file and if it’s 64bit, use the setup64.exe file. Click Install thru all the installation process.
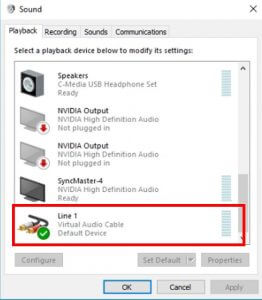
After the installation is completed, VAC will add a new audio device to your system called “Line 1 – Virtual Audio Cable”
This audio device will be used to receive the audio channel and redirect it to all audio devices on the zero clients.
You can either use it as your Default audio device: simply right click and select “Set as default”,
or you can set a specific application to redirect its audio to that device.
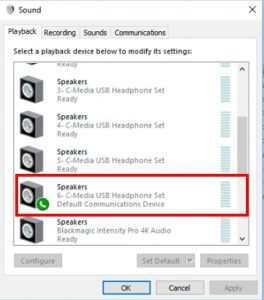
Each zero client has an Audio device that appears on your Playback Devices console as USB Audio Device.
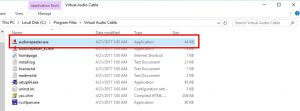
Open this folder :
C:\Program Files\Virtual Audio Cable
And run this application:
audiorepeater.exe
Setting up MAWi to run Virtual Audio Cable
After you’ve successfully installed Virtual Audio Cable (VAC) we can go on and set the configuration in MAWi:
Choose the Main screen from the list of monitors.
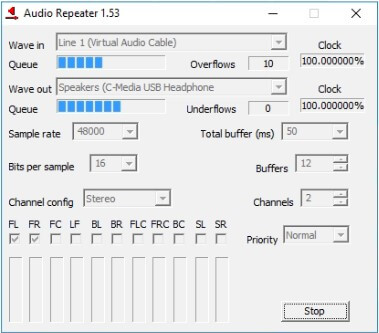
On the second field copy this line below and paste it to the Parameters Field:
/Input:”Line 1 (Virtual Audio Cable)” /Output:”Speakers (C-Media USB Headphone” /BufferMs:50 /AutoStart
/Input – should be left without change.
/Output – Replace according to the device’s name as it appears on your system.
/BufferMs – should be left without change.
/AutoStart – To make sure it starts automatically.
To get the full name of your audio device, open the audiorepeater manually and select your
USB audio device and then copy it by pressing CTRL+C, then in the parameters field simply use
CTRL+P to paste the full name of the device after the “/Output:” section.

GAP for MAWI
Finally click Save and Send and the audiorepeater app will start redirecting the sound to your zero client.
Repeat all stages above for each audio device.
You can easily set this app to run automatically when MAWI starts,
Related Articles
How to send different audio channels to different screens using VLC
How to send different audio channels to different screens using VLC How to send different audio channels to different screens using VLC In the following guide we will walk you through on how to stream a different audio channel to different screens by ...MAWi Zero - Quick Installation Guide - utilizing HDMI over LAN/Ethernet zero clients
MAWi Zero - Quick Installation Guide Introduction MAWi Zero is a tool for managing screen displays. Here's a simple breakdown: 1. Display unique content on individual screens. 2. Link several screens to show identical content. 3. Design large video ...Using HYPER-V, Zero Clients keeps on disconnecting
Our system requires continuous connectivity between the host PC/VM and the zero clients. Since the default configuration for Hyper-V is usually set to Shared, that can cause issues as you've encountered. In those cases, I would recommend changing the ...How can I configure the Zero Clients with a Static IP Address
If you have a DHCP server in your network you can simply connect all the zero clients to the network. Install the osBase drivers and the Network USB Utility on your control PC as per our installation guide . Start the 'Network USB ...Fix BSOD (Blue Screen Of Death) issue when using zero clients as endpoints
Introduction While using zero clients as an endpoint in the Monitors AnyWhere system, we've encountered several occasions where the Windows operating will fail and show the BSOD screen (Blue Screen of Death). After many investigations, we've managed ...