Quick Installation Guide – MAWi USB - Utilizing USB to HDMI converters for affordable Video Walls
Quick Installation Guide
MAWi USB
Introduction
MAWi USB is a tool for managing screen displays. Here's a simple breakdown:
1. Display unique content on individual screens.
2. Link several screens to show identical content.
3. Design large video walls, either in standard rows and columns or in your own unique and creative layout.
To set it up:
1. To download the MAWi installer click here
2. Install MAWi Server and MAWi Agent on the same PC that is connected to the USB to HDMI adapters.
3. Need to check if your computer can run it?
Click here to see the System Requirements
What to select when you begin installing MAWi:
- Choose "Install MAWi Agent and MAWi Server" for installing both components on the same PC.
MAWi Agent – Installation Guide
- The agent communicates with the USB to HDMI adapters through the OSBASE drivers.
- To have these drivers automatically set up, choose: 'Install additional drivers for MAWi Zero'.

Please remember to tick this box!
Doing this is crucial for the USB to HDMI adapters to function correctly.
Use HTTPs Connection
If you select to use this option, please read the information in this guide.
Additional components
By default, the MAWi Agent will be installed with the additional components:
– VLC Media Player v3
– PowerPoint Viewer
Location name
You can name the agent according to its actual physical location or leave it blank and it will be name 'Untitled'.

You have the option to specify the location's name during installation or adjust it later in the MAWi Agent settings or in the Admin panel of MAWi > Manage System panel.
Once the installation is completed, you will see this Login screen:
Use your username and password credentials that you set while installing the MAWi Server to login the Agent.
MAWi Server Installation Guide
MAWi Server runs an IIS Web app and a database that is running over MS SQL Server.
Please note:
In case you have just a single site you can choose to install both, MAWi Server and MAWi Agent, on the same PC or virtual machine.
Database
When selecting to install MAWi Server, it will check if the MS SQL Server is installed on the machine.
By default it will install the database on a LocalDB platform but if you untick this option, it will download and install the SQL Server 2019 Express version.
Use HTTPS
You can enable the connection to the MAWi Management console and MAWi agent over a secured SSL link.
In the next step you will have to enter the username and password for the initial setup of the system:
Once the installation is completed, you will see the following page:
It will provide you the URL for logging into the MAWi management console, and the initial username and password configured.
Supported operating systems
Windows® 10/11 64bit PRO or Enterprise, Server 2012 R2, Server 2016, Server 2019, Server 2022
The MAWi Server can be installed on a PC or a VM and can also reside on the same machine with MAWi Agent.
CPU
Intel Dual Core or AMD with similar capabilities. Core i5 of the latest generation is recommended.
If used on a virtual machine, assign at least 2 vCores.
Network
Gigabit Ethernet network is recommended.
Communication with the server-side is done over port 60668
Communication with the client-side is done over port 60669
Those ports can be changed.
Static IP is recommended.
Others
1. During the installation process, the installer will download the following components from the Internet:
– .NET Framework 3.5
– SQL Server 2022 Express or SQL LocalDB 2019
– Node JS v22
– IIS Express 10 or using the built-in IIS Server (In server based operating systems)
– Web Platform plugin
– Rewrite URL for IIS
– Visual C++ Redistributable (32 and 64bit)
Offline installation
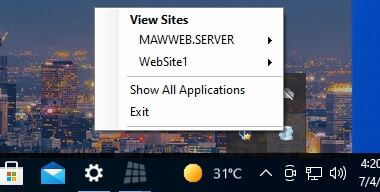
2. In case you’ve installed MAWi Server on Windows 10/11 OS, IIS Express is also installed and running in the background at all times.

You need to make sure that this icon is running in your taskbar:
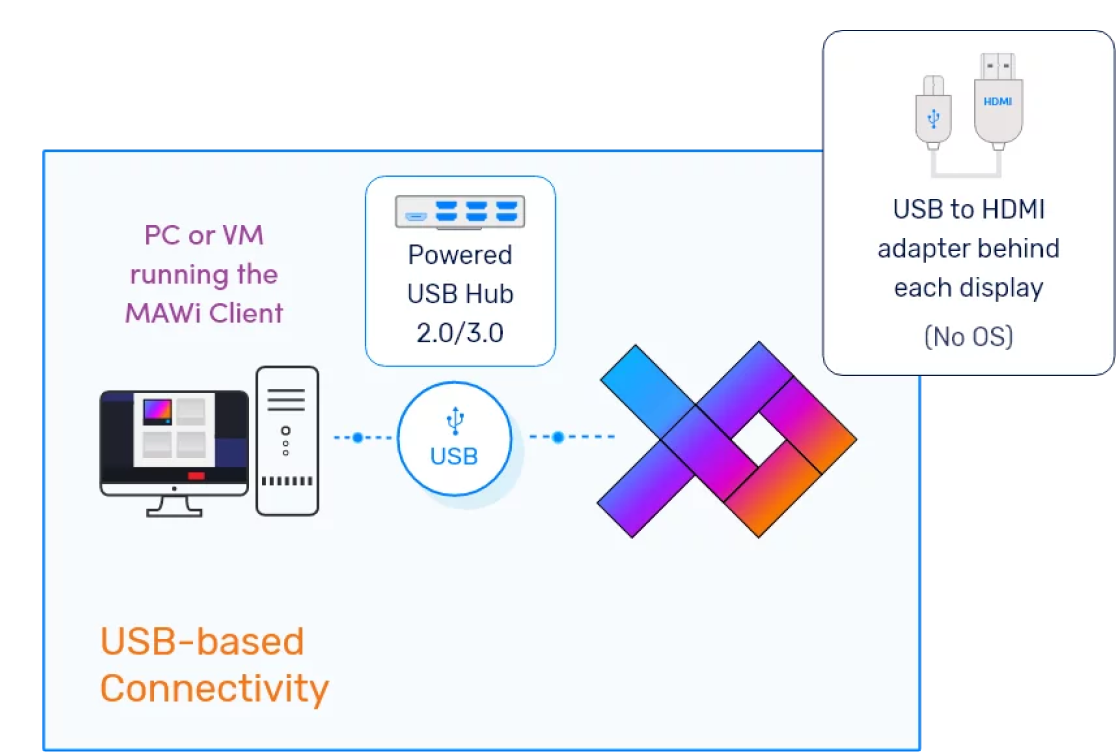
Connect the USB to HDMI Adapters to the host PC
MAWi USB uses USB to HDMI Devices as the endpoints that connect to the screens.
On this guide, we will walk you through the process of installing and configuring your host PC to run with our USB clients.
Connecting the USB Video dongles
1.
Connect each of the USB to HDMI adapters to your
displays via an HDMI cable
2. Connect each USB to HDMI adapter to a USB Hub via a USB cable. We recommend using a powered USB hub in case you are using more than 3 devices.
3. Connect the USB Hub to your PC and make sure the displays are showing your desktop image. We recommend connecting each USB to HDMI adapter at a time. Every time you see the desktop image on the display you can connect the next device.
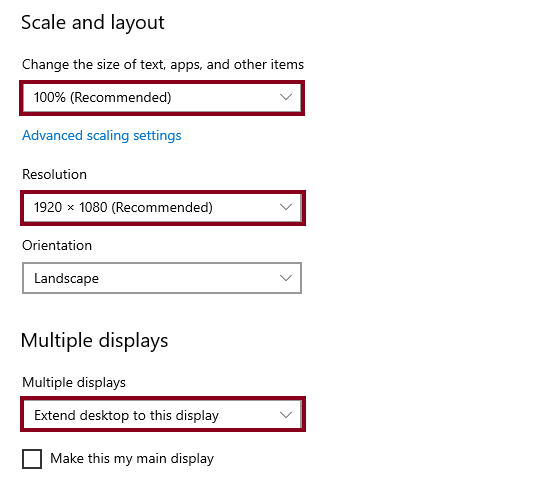
3. Configure all screens
a. Right click on the desktop and select Display settings
b. Make sure scaling is set to 100% in the “Change the size of text…” section.
c. Set the resolution.
d. Make sure Multiple displays is set to “Extend desktop to this display”
e. Repeat the same procedure for all screens connected to your PC.
Follow the guide below to create a video wall layout:
How to configure a Videowall using MAWi - Grid and Creative layout
Activate your license
To license the MAWi system, please follow the steps below:
1. Open MAWi Management Console
– Open your browser and log in with your credentials to the MAWi Management Console.
– Click on ‘ Dashboard’ – Select the Admin Panel > Licenses
– Enter your Activation Key or generate an offline license request.
For more details, please refer to this guide.

Related Articles
MAWi Zero - Quick Installation Guide - utilizing HDMI over LAN/Ethernet zero clients
MAWi Zero - Quick Installation Guide Introduction MAWi Zero is a tool for managing screen displays. Here's a simple breakdown: 1. Display unique content on individual screens. 2. Link several screens to show identical content. 3. Design large video ...MAWi Spacewall - Quick Installation Guide - Utilizing Android-based MAWi Players
MAWi Spacewall - Quick Installation Guide Introduction MAWi Spacewall is a tool for managing screen displays. Here's a simple breakdown: 1. Display unique content on individual screens. 2. Link several screens to show identical content. 3. Design ...MAWi Standalone - Quick Installation Guide - Utilizing Mini PCs or NUCs for your digital signage and Kiosks
MAWi Standalone - Quick Installation Guide Introduction MAWi Standalone is great for places with one or more TVs that want to show 4K content with dedicated audio and interactive features. Just connect a mini Windows PC to the TV, install the MAWi ...How to install MAWi Agent if the PC is not connected to the Internet - Offline installation
Last update: 3rd of July, 2023 This manual provides step-by-step guidance for executing an offline installation of MAWi Agent. It proves particularly beneficial in situations where network restrictions prevent the downloading of necessary components ...MAWi Link - Quick Installation Guide - Using Android-based devices for a Standalone Configuration
MAWi Link - Quick Installation Guide Introduction MAWi Link is a tool designed for managing screen displays. Here's a simple breakdown of its features: 1. Display unique content on individual screens. 2. Schedule content playback across screens ...